CI/CD with Bitbucket Pipelines and AWS ElasticBeanstalk Dockerized Deployment with docker-compose.yml + AWS Secret Manager (2023)

I’m going to share a very simple yet effective setup to create a CI/CD pipeline using Bitbucket pipelines and AWS ElasticBeanstalk for auto scaling. The whole setup consists of:

  1. bitbucket-pipelines.yml
  2. A python deployment script.
  3. Part of a Terraform config to create the ElasticBeanstalk environment.
  4. docker-compose.yml and some details about ElasticBeanstalk configuration files.

bitbucket-pipelines.yml

image: python:3.7.2

pipelines:
  custom:
    deployment-to-staging:
      - step:
          name: Package application
          image: kramos/alpine-zip
          script:
            - zip -r artifact.zip * .platform .ebextensions
          artifacts:
            - artifact.zip
      - step:
          name: Deployment
          deployment: STAGING
          trigger: automatic
          caches:
            - pip
          script:
            - curl -O https://bootstrap.pypa.io/pip/3.4/get-pip.py
            - python get-pip.py
            - python -m pip install --upgrade "pip < 21.0"
            - pip install boto3==1.14.26 jira==2.0.0 postmarker==0.13.0 urllib3==1.24.1
            - python deployment/beanstalk_deploy.py
            - deploy_env=STAGING
            - new_tag=$deploy_env$(date +_%Y%m%d%H%M%S)
            - git tag -a "$new_tag" -m "$new_tag"
            - rm -f .git/hooks/pre-push
            - git push origin --tags

For this pipeline to work there are some prerequisites. First, you need to setup deployments on Bitbucket. This is usually found in this path under your project:

/admin/addon/admin/pipelines/deployment-settings

There, you need to enable deployments and set up your staging deployment with a minimum of two environment variables within the deployment.

APPLICATION_NAME // Which is your AWS ElasticBeanstalk application name
APPLICATION_ENVIRONMENT // Which is your AWS ElasticBeanstalk environment name.

We need three other environment variables in the “Repository Variables” section of the repo:

S3_BUCKET // This is where the zipped application code is uploaded then to be deployed to Beanstalk.
AWS_SECRET_ACCESS_KEY // AWS secret access key for authentication to AWS services.
AWS_ACCESS_KEY_ID // AWS access key id for authentication to AWS services.

Every Beanstalk application can have many environments. I usually set the applications as different environments as in “Production-Application” or “Staging-Application” and then in these applications I have “Web-Environment” and “Worker-Environment” and so on.

Deployment Script

# Copyright 2016 Amazon.com, Inc. or its affiliates. All Rights Reserved.
#
# Licensed under the Apache License, Version 2.0 (the "License"). You may not use this file
# except in compliance with the License. A copy of the License is located at
#
#     http://aws.amazon.com/apache2.0/
#
# or in the "license" file accompanying this file. This file is distributed on an "AS IS"
# BASIS, WITHOUT WARRANTIES OR CONDITIONS OF ANY KIND, either express or implied. See the
# License for the specific language governing permissions and limitations under the License.
"""
A Bitbucket Builds template for deploying
an application to AWS Elastic Beanstalk
[email protected]
v1.0.0
"""
from __future__ import print_function
import os
import sys
from time import strftime, sleep
import boto3
from botocore.exceptions import ClientError, WaiterError

VERSION_LABEL = strftime("%Y%m%d%H%M%S")
BUCKET_KEY = os.getenv('APPLICATION_NAME') + '/' + VERSION_LABEL + \
             '-bitbucket_builds.zip'


def upload_to_s3(artifact):
    """
    Uploads an artifact to Amazon S3
    """
    try:
        client = boto3.client('s3', region_name='eu-central-1')
    except ClientError as err:
        print("Failed to create boto3 client.\n" + str(err))
        return False

    try:
        client.put_object(
            Body=open(artifact, 'rb'),
            Bucket=os.getenv('S3_BUCKET'),
            Key=BUCKET_KEY
        )
    except ClientError as err:
        print("Failed to upload artifact to S3.\n" + str(err))
        return False
    except IOError as err:
        print("Failed to access artifact.zip in this directory.\n" + str(err))
        return False

    return True


def create_new_version():
    """
    Creates a new application version in AWS Elastic Beanstalk
    """
    try:
        client = boto3.client('elasticbeanstalk', region_name='eu-central-1')
    except ClientError as err:
        print("Failed to create boto3 client.\n" + str(err))
        return False

    try:
        response = client.create_application_version(
            ApplicationName=os.getenv('APPLICATION_NAME'),
            VersionLabel=VERSION_LABEL,
            Description='New build from Bitbucket',
            SourceBundle={
                'S3Bucket': os.getenv('S3_BUCKET'),
                'S3Key': BUCKET_KEY
            },
            Process=True
        )
    except ClientError as err:
        print("Failed to create application version.\n" + str(err))
        return False

    try:
        if response['ResponseMetadata']['HTTPStatusCode'] is 200:
            return True
        else:
            print(response)
            return False
    except (KeyError, TypeError) as err:
        print(str(err))
        return False


def deploy_new_version(environment):
    """
    Deploy a new version to AWS Elastic Beanstalk
    """
    try:
        client = boto3.client('elasticbeanstalk', region_name='eu-central-1')
    except ClientError as err:
        print("Failed to create boto3 client.\n" + str(err))
        return False

    try:
        client.update_environment(
            ApplicationName=os.getenv('APPLICATION_NAME'),
            EnvironmentName=os.getenv(environment),
            VersionLabel=VERSION_LABEL,
        )
    except ClientError as err:
        print("Failed to update environment.\n" + str(err))
        return False

    waiter = client.get_waiter('environment_updated')
    try:
        waiter.wait(
            ApplicationName=os.getenv('APPLICATION_NAME'),
            EnvironmentNames=[os.getenv(environment)],
            IncludeDeleted=False,
            WaiterConfig={
                'Delay': 20,
                'MaxAttempts': 30
            }
        )
        return True
    except WaiterError:
        print('Deployment might be failed or it might be a false positive. Please check beanstalk.')
        return False


def main():
    " Your favorite wrapper's favorite wrapper "
    if not upload_to_s3('artifact.zip'):
        sys.exit(1)
    if not create_new_version():
        sys.exit(1)
    # Wait for the new version to be consistent before deploying
    sleep(5)
    if not deploy_new_version('APPLICATION_ENVIRONMENT'):
        sys.exit(1)

if __name__ == "__main__":
    main()

The deployment script is pretty much self explanatory. It gets the zipped code of the application which was created in the first step of the pipeline and creates a new beanstalk application version. Then it deploys the new version to beanstalk and waits for the status to change to environment_updated and that’s it.

You can see the line in the pipeline yml file where it calls:

python deployment/beanstalk_deploy.py

This means your script is under a folder named deployment within your source code.

Terraform for Elasticbeanstalk

The following is a section of a terraform file that I’m using to create resources on AWS. This file won’t work by itself but it can give you a general idea.

Specifically, you need to set some data and some resources before this section of the file. For example, you need to set your vpc data like this:

data "aws_vpc" "my_vpc" {
  id = "your-vpc-id"
}

So that this section can use the variable “data.aws_vpc.my_vpc”.

resource "aws_elastic_beanstalk_application" "examplewebapp_staging" {
  name        = "examplewebapp-staging-application"
  description = "Examplewebapp Staging Application"

  appversion_lifecycle {
    service_role          = "arn:aws:iam::502026590581:role/aws-elasticbeanstalk-service-role"
    max_count             = 128
    delete_source_from_s3 = true
}

resource "aws_elastic_beanstalk_configuration_template" "examplewebapp_staging_template" {
  name                = "examplewebapp-staging-template-config"
  application         = aws_elastic_beanstalk_application.examplewebapp_staging.name
  solution_stack_name = "64bit Amazon Linux 2 v3.5.5 running Docker"
  setting {
    namespace = "aws:autoscaling:launchconfiguration"
    name      = "InstanceType"
    value     = "c5.2xlarge"
  }
  setting {
    namespace = "aws:autoscaling:launchconfiguration"
    name      = "IamInstanceProfile"
    value     = "aws-elasticbeanstalk-ec2-role"
  }
  setting {
    namespace = "aws:autoscaling:launchconfiguration"
    name      = "EC2KeyName"
    value     = "examplewebapp-beanstalk-staging"
  }
  setting {
    namespace = "aws:autoscaling:launchconfiguration"
    name      = "SecurityGroups"
    value     = data.aws_security_group.default.id
  }
  setting {
    namespace = "aws:ec2:vpc"
    name      = "Subnets"
    value     = aws_subnet.private_subnet.id
  }
  setting {
    namespace = "aws:ec2:vpc"
    name      = "VPCId"
    value     = data.aws_vpc.my_vpc.id
  }
  setting {
    namespace = "aws:ec2:vpc"
    name      = "ELBSubnets"
    value     = data.aws_subnet.public_subnet.id
  }
}

resource "aws_elastic_beanstalk_environment" "examplewebapp_staging_environment" {
  name                = "examplewebapp-staging-environment"
  application         = aws_elastic_beanstalk_application.examplewebapp_staging.name
  template_name = aws_elastic_beanstalk_configuration_template.examplewebapp_staging_template.name
  tier                = "WebServer"
}

With this section of the terraform we created an Elasticbeanstalk application called examplewebapp-staging-application and an Elasticbeanstalk environment called examplewebapp-staging-environment.

docker-compose.yml and ElasticBeanstalk Configuration Files and Folders

docker-compose.yml

version: '3.8'
services:
  app:
    build:
      context: .
      dockerfile: Dockerfile
    restart: always
    env_file:
      - .env
    ports:
      - 80:80

This is a very simplified docker-compose.yml file. When ElasticBeanstalk fetches your application version, it unzips it and checks for several things.

If it finds a docker-compose.yml file it uses the file to create the containers. Here’s there’s a trick. You might have a docker-compose.yml file for your development environment and another one for the staging/production environments. Let’s say you have these files:

  • docker-compose.yml // for development.
  • docker-compose.beanstalk.yml // for staging/production deployments.

You don’t want to use the default docker-compose.yml file to deploy to elasticbeanstalk environments so you need rename your docker-compose.beanstalk.yml file to docker-compose.yml file so that beanstalk creates the actual containers.

You can achieve this with beanstalk platform hooks. All you need to do is creating a folder called .platform/hooks/prebuild in your source code and put some scripts there to be run before the docker container creation.

.platform/hooks/prebuild/01prepare.sh

cp docker-compose.beanstalk.yml docker-compose.yml

Another thing we are missing now is the .env file within the docker-compose.beanstalk.yml. Let’s say we have created our environment variables in AWS Secret Manager. Now, we need to fetch those and put them in a file called .env so that our docker compose does not break. We can update out 01prepare.sh file to do this:

cp docker-compose.beanstalk.yml docker-compose.yml
aws --region "eu-central-1" secretsmanager get-secret-value --secret-id "examplewebapp_staging" | \
  jq -r '.SecretString' | \
  jq -r "to_entries|map(\"\(.key)=\\\"\(.value|tostring)\\\"\")|.[]" > .env

This will create the .env file with the proper format and that’s it.

Debugging Problems

There’s only one certainty: Deployments will fail! There can be many reasons, some missing configuration, wrong instance type that can’t handle your app, other errors in your AWS setup and so on. Anything is possible.

When your deployment fails, ElasticBeanstalk will give you some information but that is usually not enough by itself. You’ll need to get into the EC2 instance that Beanstalk created and check the logs under /var/log.

The main file that I check to debug problems is eb-engine.log. I usually do a tail -f to that file when trying to deploy new versions at the very first setup. Once the deployments are successful you won’t need to check these logs ever again unless there’s a change in your deployment setup.

Conclusion

This is probably 95% of what you need to do to create an automated CI/CD pipeline on Bitbucket with AWS Elastic Beanstalk and AWS Secret Manager. The remaining 5% are small adjustments here and there which you’ll need to do depending on the information you get from failed deployments. I tried to give all the information but it’s possible that I forgot some minor details.

There are a lot more configuration details for Elastic Beanstalk so I suggest you deep dive into AWS docs.

Thank you for reading.
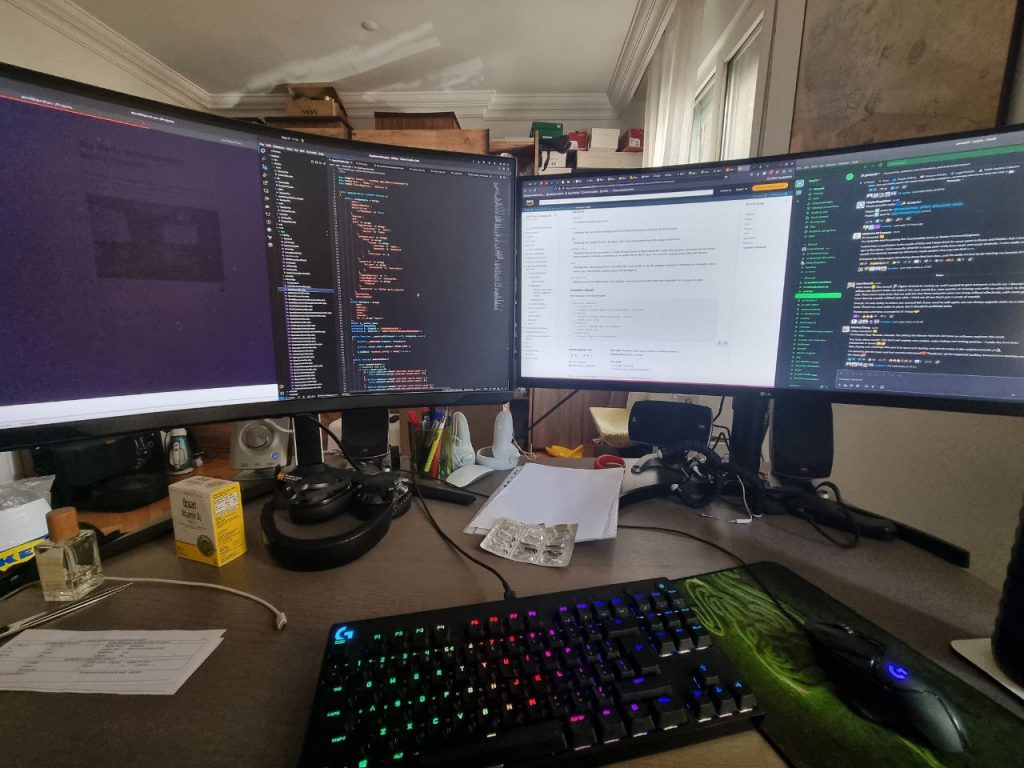
My daily development environment

I wanted to describe and document my development environments as it is these days as of May 25th, 2023. It will be fun to look back in the future and compare it to what I do in the future.

Yes, a bit messy but I love it

This is my desktop setup at home.

Hardware

  • Intel i9 13900k CPU
  • 32 Gb DDR5 RAM
  • Nvidia RTX 3060Ti
  • 2 SSDs and an 8Tb hard disk
  • 1 4k monitor and 1 HD ultra wide monitor
  • LG %80 Mechanical Keyboard
  • LG Gaming mouse

The hardware is pretty good for gaming in 2023. When I first bought it I played a lot of games but for the last couple of months I only use it for development.

Does it make sense to do development on such a high end PC? My personal answer is YESSSS with multiple Ss. Some advantages are:

  • You can run a crazy amount of programs smoothly. For instance, I start multiple windows of PyCharm and/or VSCode smoothly among many many other things like browsers with crazy amounts of tabs open and so on. The system doesn’t even go into crazy fan noise mode most of the time.
  • Your tests run crazy fast. If your software projects have unit tests or some integration tests, they run crazy fast on this hardware which saves me a lot of time actually. Just to give an example I work on a project with around 300 tests. Mostly integration tests plus some unit tests. On my Mac M1 laptop they run in 1 minute while on my desktop PC they run in 13 seconds. Almost 10 times faster. It saves a huge amount of time thus making me much more productive during the day.

Operating Systems

  • Windows 10 for gaming
  • Ubuntu 22.04 for development
  • Mac OS on the laptop

Up until 2018 I always used different Linux distributions for development or sometimes a Linux distribution on a virtual machine on Windows. The latest distribution I liked was Linux Mint. I switched to it after Ubuntu changed its UI manager and I used it for a couple of years until the company I started to work for in 2018 gave me a Mac laptop.

I never liked Apple products because, simply, I think they are overpriced, especially before the IPod era began. Their desktop specs were crazy expensive compared to a custom built PC. Because of my personal history with overpriced Macs I still don’t like Apple products.

Unfortunately most of the world don’t agree with me on this 🙂 For the last 5 years all the companies I worked for just gave me Mac laptop so I mainly used those laptops for software development.

Last year, towards the end of 2022, I decided to give Ubuntu a chance again. I must admit that it’s much better than the last one I used but still has some problems that never existed in Macs or Windows. One problem I have now is that I can’t get any sound from the SPDIF output. On Windows it works fine but on Ubuntu it just doesn’t work (yes, I tried many many solutions from Google and ChatGPT). These kinds of things were always an issue with Linux distributions and it just didn’t get any better even after more than 20 years. Still, this is not a primary issue for me while coding so it’s ok for now.

Daily Routine

This is the actual fun part. I wake up, go for a medium intensity walk with my wife, come back, make some coffee for both us and after she leaves I sit on my table and start the PC. On the desktop screens my daily routine is:

  1. Start Firefox. This is where my personal stuff goes. Gmail, music from youtube and so on…
  2. Start Chrome. I have different profiles in Chrome for different projects so all the tabs and histories are divided to different profiles which makes it cleaner and easier to manage.
  3. Start terminal. I use bash on pc and zsh on the laptop with on my bash and oy my zsh plugins.
  4. Start VSCode or PyCharm or PHPStorm depending on which project I’m working on.
  5. Start Telegram, Whatsapp and Slack for work.

In the monitors above I can see four of these windows at the same time side by side which increases productivity by removing a lot of switching back and forth.

I want to give a little bit of detail about shells and “Oh My Bash”/”Oh My Zsh”. In my opinion, these are also very useful productivity boosters. They have their own plugins to manage history, the plugins I use for Oh My Zsh are:

Development Routine

Up until a couple of months ago my development routine was coding in the IDE and looking things up on google and reading a lot of documentation. But, as we all know, there’s ChatGPT now so my development routine changed drastically and became much more productive. Right now my development routine includes the following:

  • IDE.
  • Github Copilot integrated into the IDE.
  • ChatGPT (mostly) instead of Google.
  • Google for some stuff ChatGPT can’t handle.

In my own personal experience, this combination is an incredible productivity booster. I love Github copilot suggestions which most of time just still amaze me and I love talking to ChatGPT instead of looking things up on google and going to multiple websites to find something.

Conclusion

Always looking to improve the overall productivity this is where I’m at. If you stumble upon this post and you have suggestions please tell me.

What to Write

Starting from February this year, I’ve made a calendar for myself as described here. I must admit it feels good to follow this system and I feel like I’m producing “something”. Even though it’s mostly for self reference I enjoy it very much when some random person reads one of my posts and asks me questions on Linkedin.

After a couple of months I found out that the more I keep this going the more challenging it becomes to find something to write about.

There are people that actually make a living out of writing articles, books etc. I admire them. To me, it’s a difficult task at the moment since I don’t have an actual system in place to find subjects.

Sometimes, within the week, I think about something to write about and I just forget about it on the writing day. Sometimes, I just don’t have the brainpower to create something on the writing day. It’s hard to just come up with stuff with no previous plans.

I am going to keep writing so I should find a good approach to find new topics every week. Actually, I keep doing interesting stuff for work, maybe I should share more on what I actually do on a daily basis.

I now sacrifice this post to plan future posts so I’m just going to write down random stuff that I do here and I will write about them in my future posts.

  • My daily development environment.
  • CI/CD with Bitbucket pipelines and AWS Elasticbeanstalk.
  • My current state on Web3 technologies.
  • General thoughts on software engineering.
  • Software development before and after AI tools.

I will write about these topics in the following weeks in an unordered way. I might also write about some other random thing but at least I have a plan to cover for five weeks.

Some AI Art from Midjourney

This week I’m a little bit behind on my projects and there were a lot of urgent cases at work so instead of a post, I decided to generate some AI art on Midjourney:

psychedelic skull with many colors –s 250 –v 5
futuristic Turkish soldier –s 250 –v 5
a blog with ai generated photos –s 250 –v 5
a pug with a cape saving her owner –s 250 –v 5
a software engineer writing the best code of the world –s 250 –v 5
AI taking over the world –s 250 –v 5
epic battle between elves and dwarfes –s 250 –v 5
a week before the elections, people deciding who to vote. –s 250 –v 5
taking vitamin suplements and feeling better –s 250 –v 5

Whenever I don’t have time writing or I don’t feel like it, this is a good way to fill the week. At least it looks refreshing :))

Boosting Efficiency: Technical Improvements for Boomset – Part 3

I’m sorry to say that this part was a small mistake causing big reactions just like part 1. I don’t think it will take too much time to explain so I’m hoping this one will be a very short one.

Many websites these days have an HTTP server to serve responses to requests made from various clients. Faster responses are directly related to better user experience so everyone wants to minimize the work done in a request-response cycle. To achieve this, some time consuming tasks are sent to a background worker to be process asynchronously. Some examples include “sending emails”, “generating activity streams”, “generating reports” and so on. When your primary programming language is Python a very popular choice is to use Celery to process background jobs.

When I joined Boomset the system had around 9 background worker instances. One of them was consuming close to 100% CPU all the time. This was not perceived as a problem back then, everyone including me was thinking that there are a lot of jobs to be processed and that this is probably normal.

After many months, when my responsibilities grew, I decided to deep dive into the workers and see if I could optimize something.

The situation was something like this:

  • 1 general worker consuming many queues at max CPU most of the time.
  • 8 separate workers instances consuming different special queues.
  • Whenever we needed some new background processes create a new EC-2 instance and boot up a new worker.

The problem: Multiple Celery Beats

When I deep dived into the general worker instance the first thing I did was to check the running processes with top or htop. It took me a couple of seconds to notice something was starting and dying in an infinite loop. We were using supervisorctl to boot workers within the instance and it tried to boot up celery beat got an error and tried again instantly. The error was that there was already a celery beat running and that it couldn’t boot so it tried to boot it up forever. This was causing the CPU to go crazy.

The solution: Don’t try to boot multiple Celery Beats

Well, as I said, both the problem and the solution are pretty easy and straight forward. I fixed the supervisorctl configuration so that only one celery beat would be started and everything went to normal in an instant. The CPU went from 100 to 15-20 just like that.

This CPU thing caused everyone to believe that the worker was actually really busy so the road map was always to create new instances for new background tasks. Like a bad chain reaction this caused the company to pay more for more instances.

The next thing I did was to remove all other instances and have only one worker bigger instance. These changes caused 33% savings on our AWS account and it helped me get a better bonus and raise.

Conclusion

This was another small mistake that lived under the radar for a very long time. I believe our software engineering ecosystem is full of such things. We should be really careful to do things right so that we don’t waste money and resources. My way of thinking in such cases is not primarily about saving someones money but about saving resources. In this example, the small mistake caused hundreds maybe thousands of hours of running EC2 instances, many many hours of software engineering time went into configuring multiple environments and deployment for new worker instances and lastly it caused the company to waste a lot of money. The amount of money spent was enough to pay for an extra engineer every month for our small team. So, please be careful and don’t shoot yourself in the foot 🙂

Deep into the Abyss

I’ve been so deep into optimizing my long running website that I don’t have anything to share this week. You know the times when you get deep into something and it pulls you in more and more.

Image from Midjourney depicting me during these days

For example, yesterday my goal was to update the JQuery and JQueryUI versions to latest. I think the site was using an at least ten year old version of JQuery (1.6). This causes bad things to happen such as “google punishing your site” because it has some high impact security vulnerabilities.

I started by updating the JS tags to fetch the latest versions. Of course some stuff broke. The autocomplete wasn’t working anymore and the dialog had something weird going on. To test the autocomplete I have to enter a single character to the input field. Guess what!!! the autocomplete doesn’t return anything because the dockerfile of the very old version SOLR that I’m using is broken.

Now, I have to fix that first. Somehow I don’t want to return a predefined response for the autocomplete. I take this as an excuse to fix the old docker image. The image is in a github repository that I forked from someone else. The reason it’s not building is that Debian jessie is now archived and the build process cannot fetch the packages from the sources. I now have to update the sources to archive.debian.org so I dive into that and after some tries it’s done!

So I fix the broken image and I can index my items in SOLR. I try the autocomplete and it doesn’t work as intended. It shows escaped html instead of rendering it. Okay, ask my telegram chat bot which is connected to ChatGPT, it gives me the answer and I implement it. That’s fixed.

Now, I have to fix the dialog box of JQueryUI. I don’t even remember what I did to fix that, it was related to some CSS properties from W3.CSS that was breaking the styles of JQueryUI. I think I fixed it by overriding some styles. I don’t remember exactly because while doing this I deep dived into another old css file and I started cleaning up unused css to free up some bytes.

While doing all these I removed an old class called “dnone” and I replaced it “w3-hide”. It turns out I used dnone all over the place and stuff is showing everywhere now so I have to find and replace all dnone usages now. After I was done with that I saw that some functionality where I used jquery.toggle() function to show/hide an element is not working. It turns out w3-hide class uses the “!important” thing so toggle() does not work as intended. Now, I don’t want to go back to dnone, I already have w3-hide and I’m going to stick with that so I decided to replace the usage of toggle with removeClass/addClass. This mostly did the job but now my modals don’t work as expected anymore.

It turns out that the modal doesn’t care about w3-hide because it’s already hidden by default. I had to revert back to using toggle for the modals to fix this. This happens when you blindly replace all your flows at once but yeah it’s part of the job.

You get the idea, and this is just the tip of the iceberg. After all this I started testing the site on PageSpeed Insights to fix things even further. I think I got some improvement but honestly, I expected more. No matter what I do, my Total Blocking Time doesn’t go to less than 380ms and that’s not even related to my stuff anymore. It’s all google ads and google tags js. I deferred, I put ads js to the very end of the body, but pagespeed still complains.

It’s time to leave it as it is for a while and work on other things. I’m sure I will find some tricks to improve these later on. Overall, I remember exactly why I became a primarily backend person. This stuff is too painful to figure out. All the browsers with their versions and some of them support something some other just don’t. You add some JS to your site to earn money and to track your traffic and google itself now complains your site is slow. To put it kindly, this is stupid.

Modernizing the Front-End of a Legacy Website to Meet Today’s Standards

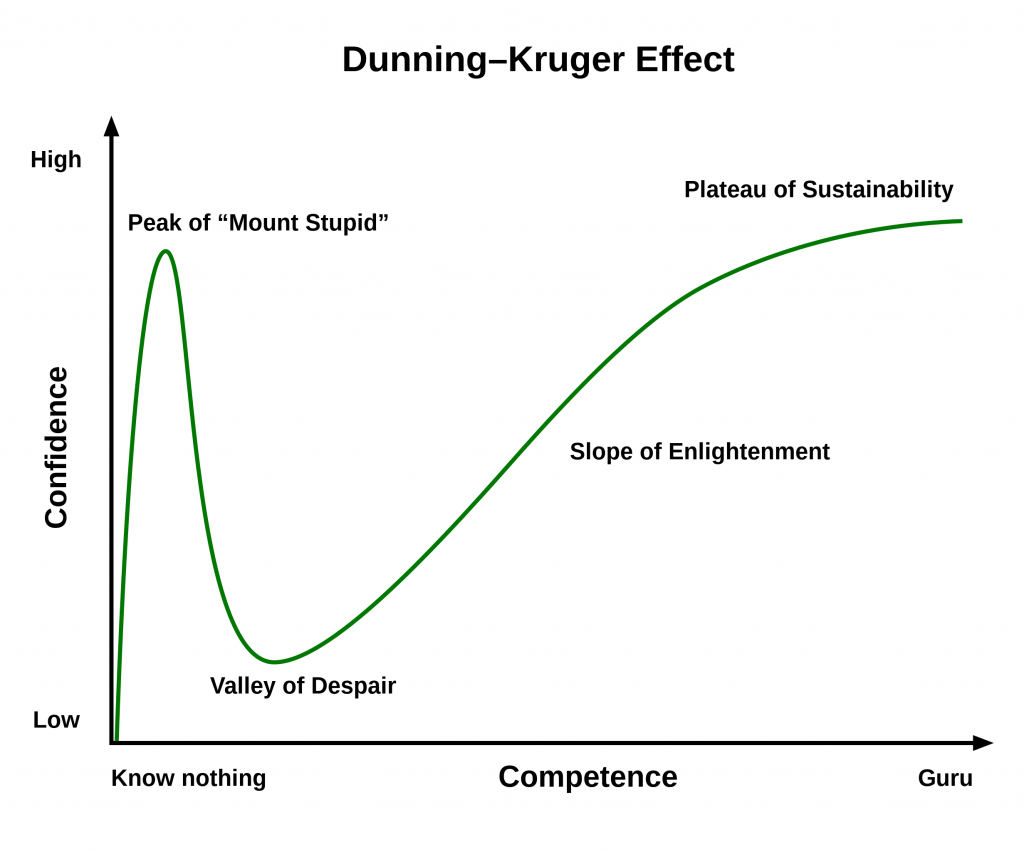
Me and a friend got into a project way back in 2010. We were not so experienced but as all not so experienced people we thought we knew it all. Speaking in Dunning-Kruger effect terms for myself, I think that I was in the slope of enlightenment phase, probably close to the middle of it.

After a year of hardcore development it was online and it became what is today known as vikitap.com.

The website was pretty popular at the beginning but with the move to the mobile devices it slowly lost its popularity. This process was visible to me during multiple years but I just didn’t have resources to spend to the issue. Throughout the years, whenever I found some time and motivation, I would go back to it and try to adapt it to today’s world.

First of all, here’s the front-end tech stack:

  • HTML with custom CSS classes.
  • Fixed width layout.
  • JQuery with some additional jquery plugins.
  • JQueryUI.

The custom CSS was really REALLY bad. There was no structure at all and inline CSS was all over the place in random places. CSS frameworks were not even popular back then or possibly they didn’t even exist. Twitters Bootstrap came out in August 19, 2011 so we were unlucky there. I remember I attempted to create a set of CSS classes to be reused within the project but in the end it was a failed attempt. I just didn’t have enough patience and ended up writing inline CSS whenever I felt like it. All this caused the website to look wrong. There was no consistency in the look and feel.

The quick solution to this was to move to a CSS framework. I chose W3.css and updated the UI with W3.css classes. I wanted the simplest solution and I thought it would be faster to implement. I didn’t want to spend too much time on researching different frameworks and at the time W3.css looked simpler to me than other frameworks. I think it does a good job and it worked really well on both desktop and mobile.

Another big issue was the fixed width layout that was really popular somewhere between 2005-2010. Back then, the only thing where you could view a website was a desktop PC. So the website UI development was looking to a single statistic: What is the most used screen resolution? I don’t remember the most popular screen resolution back then but when we started to develop the site the golden standard for the width of a website was 980px. So that’s what we did. We couldn’t foresee that mobile devices would change everything really soon.

Fortunately W3.css helped with the responsiveness issue too. I got two birds with one stone.

After the migration to the new UI and some performance tweaks to the backend for a faster website, I was expecting some big improvements with the google search results. To my surprise, nothing changed and the site was still going down. At this point, I had to take a break from working on it for a couple of years because I was too busy with life and work.

These days, I started the working process again and I’ve been consistently working on it for two months or so, couple of days every week.

From google search console, I see that my mobile experience still sucks and that I have to fix even more things for a better mobile experience:

PageSpeed Insights

The above image is the result for this link. As you can see, it’s all red. Even though the desktop experience is close to perfect, the mobile experience is the worst. It turns out now we have to really really minify the usage of everything. It’s not just about merging all your CSS and JS together and having a big single file for them. You have to extract your crucial CSS and put it in the HTML as inline CSS for the best mobile experience because downloading a big CSS file blocks the rendering of your page thus increasing your “Total Blocking Time” while it makes you site look miserable in slow mobile devices with slow internet connections.

In addition to the CSS file improvements there are other things like:

Cumulative Layout Shift” which means you have to specify the width and height of your images in the html code instead of just waiting for them to load because it will make the UI shift while the user waits for it to load.

“First Contentful Paint” which is the time it takes for the browser to render the first bit of content on the screen. A speedy FCP results in a website that appears quick and highly responsive, ultimately leading to a reduced bounce rate.

It’s very interesting to see that all these things make people stay or leave your website on a mobile device, subconsciously everyone prefers a smoother experience and that’s part of how we are hardwired as human beings. I have to thank everyone who’s sorting these problems and sharing their findings with the world to help us improve. Now it’s time to work more and get results. I’m hoping to share good results in another post in the future.

Boosting Efficiency: Technical Improvements for Boomset – Part 2

In the event industry, one of the most important functions of your system is being able to register new guests. Sometimes new guests register at the event entrance on an IPad, other times they register online through the event page. The complexity of this process is medium/high relative to a simple registration page. You might have many custom questions and/or sessions in an event and in addition to visible things on the registration form there are other things being created/updated on the back end which are invisible to the end user.

The Problem: Deadlocks

So, in case there’s a problem with any of the many steps included in this flow we want to abort all the previous database operations so our data integrity stays clean.

The approach to this flow by the early engineering team was to create a single huge database transaction and guarantee that everything was created or aborted in a single easy step. That’s probably how I would have done it too if I was the one developing that part for the first time. What this causes is that now you have one of the worst problems a software engineer might encounter: Deadlocks.

It turns out that the seemingly innocent thing called transaction is not so innocent after all. It might work very well if you are the only person using the project but under just a little bit of production load it just crumbles and turns your life into a nightmare when you see hundreds of errors raining on sentry plus it’s a Sunday plus you are outside chilling on the seaside 🙂

This problem was detected on live events but it was hard for the team to replicate so it just stayed there. Here’s another issue, the way the team was trying to replicate this issue was this:

  1. Write a simple script that makes a request to the endpoint.
  2. Share the script with the team.
  3. Tell the team to run the script at the exact same time on 3, 2, 1 and go!
  4. See what happens.

Unfortunately, this process is not enough to trigger a deadlock unless your teams size is hundreds of people. In our case the team was six people and after the test everything seemed fine when it actually was not.

The Solution

From this point onward I decided to spend a weekend on the issue because it was not in our current sprint and I got that urge to fix stuff. I modified my local setup to make it similar to our production environment and created a JMeter configuration to trigger the deadlock. After everything was ready I got failed requests on the first try.

Okay, now the triggering the deadlocks issue was solved. It’s time to fix the actual issue now. After many stackoverflows and google searches I had some ideas about the deadlock problem. Here are the possible issues:

  1. The order of the database queries might be causing the issue.
  2. The size of the transaction might be a problem because of the time it blocks other requests.

Well, the order wasn’t the issue in our case and it was obvious that the huge transaction block was the problem. I decided to break the huge transaction into smaller transactions. Actually, I moved most of the code out of the transaction and just created transactions in some crucial spots.

A new problem is generated from all this. Now, when you have a failing step you end up with a little bit of corrupt data. You do a couple of inserts and something fails, you immediately return an error to the user. There are no more transactions to take care of your wrongfully inserted data. This is not the end and you have a couple of options here too:

  1. Manually clean things up.
  2. Just leave it there and don’t bother.

Manually cleaning things up might sound like the way to go but that’s not what I did :). To decide what to do, at first, I just didn’t bother and wanted to watch what happens. You know what? We never had anything fail ever again in that process. This statement is probably not 100% accurate but I think it’s at least 99.99% accurate. The amount of problems was so small and unrelated that going for the first option (manually cleaning things up) would have been a waste of time anyway.

Conclusion

I was lazy to write a conclusion so I asked ChatGPT and here it is:

In conclusion, the process of registering new guests at an event can be complex. The early engineering team attempted to solve this complexity by creating a single large database transaction, but this led to the problem of deadlocks under production load. After extensive testing and research, it was determined that breaking the transaction into smaller ones and moving code out of the transaction resolved the issue. While this led to the problem of potentially corrupt data in the event of a failing step, it was found that the amount of problems was so small that manually cleaning up was not necessary. This experience highlights the importance of thoroughly testing and refining systems to ensure data integrity and minimize potential problems.

Boosting Efficiency: Technical Improvements for Boomset – Part 1

In 2018, I embarked on a career in the events industry. To ensure that my technical expertise wasn’t lost over time, I decided to create a post where I could document my experiences and refer back to it as needed. The industry here is probably irrelevant since all things I’m going to share are on the technical side of things. They don’t have anything to do with the events industry itself.

The project was built using Django and Python 2.7, and hosted on AWS. Fortunately, it had been dockerized shortly before I joined, making it relatively straightforward to set up a development environment. During my first month, I tackled some minor tasks until the first major issue arose.

The Problem: Static Variables in Python Classes

There was a long time unsolved issue where customers created an integration to sync data from a third party to their event. Randomly, people’s data got mixed and you could see an integration disappear from an event and appear in a completely unrelated one. We had an engineer who was exclusively focused on fixing these sorts of problems through manual database checks and attempting to update integration and event IDs.

Based on my experience, it became immediately apparent that the problem at hand was caused by improper usage of class static variables. Upon further investigation, I discovered that this had been going on for nearly two years. It’s staggering to think about the amount of engineering resources that have been wasted as a result.

The Solution

I’m not going to share the actual code (it’s probably illegal) but here’s the explanation: When you use static variables in python and serve your project on uwsgi the static variables are shared between all request/response life cycles. This might sound obvious to some but for example it is not the case when you have a PHP project. When you serve a PHP project your static variables are created and destroyed at the end of each request/response flow. The context in python served with uwsgi is not the same and your variables are shared between all request response flows for that each server. To visualize this check out the following example:

class Integration(object):
    event_id = 123

    def do_something(self, event_id):
        Integration.event_id = event_id

This should be enough to show what was happening. Each time you call the method do_something with another event_id, all the event ids in all the requests change to the latest event_id. All of a sudden your integration becomes the integration of an unrelated event when you call .save() somewhere. The fix was easy, just move the static variables to instance variables:

class Integration(object):
    def __init__(self, event_id):
        self.event_id = event_id

Conclusion

This is the end of part 1, where a seemingly simple issue had been consuming engineering resources for almost two years. Solving this problem not only improved efficiency but also provided a sense of accomplishment. In part 2, I’ll tell the story with the database transaction issues – and how I was able to overcome it. Stay tuned 🙂

The Future of Tech Life in 2023: Navigating Layoffs and Banking Challenges

Layoffs

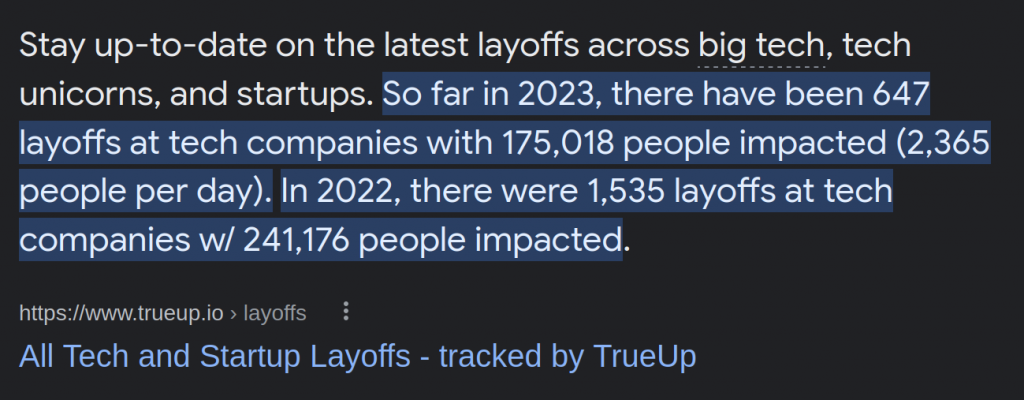
Things are not going well for the software tech industry. Starting from 2022 all we hear is bad news. Unfortunately, my current employer Hopin started laying off its employees in early 2022, and we faced three major waves of layoffs just in 2022. The situation was incredibly stressful. The news of possible lay-offs and the whole process of speculation, rumors, and anxiety took a toll on my health. I can’t even imagine how daunting it was for individuals being laid off from tech giants like Meta, who subsequently had to leave the country.

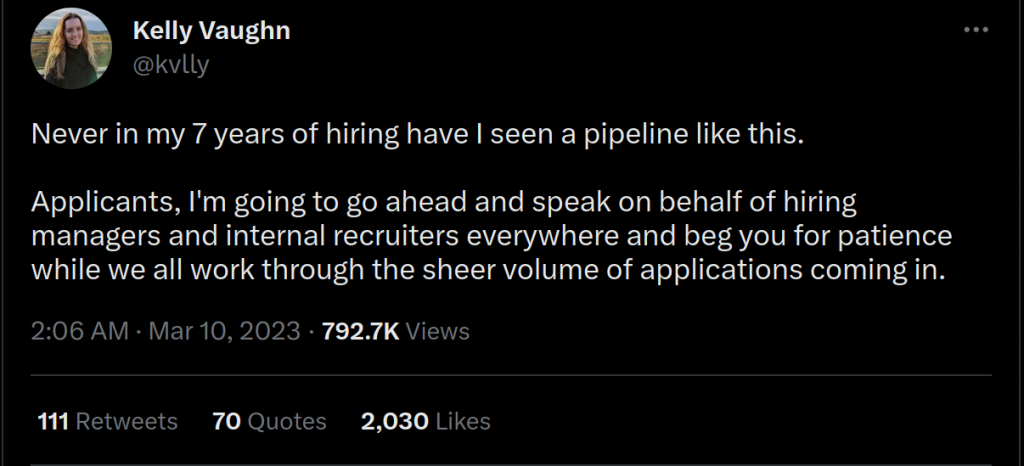
There’s also this tweet shared by a friend in a telegram group chat that caught my attention.

As my contract is coming to an end in September 2023, I will need to actively start job hunting, and I might be just one of the many hopefuls in the market. The current situation seems to be quite unpredictable, making it challenging to have a clear picture of what lies ahead. Nevertheless, I continue to hope that this is just a temporary setback and that the future holds promise for better things.

Banking Challenges

Despite the ongoing news about layoffs, we are now seeing reports of banks facing bankruptcy. I use the term bankruptcy as I am not an expert on the issue. In my head, this whole thing is some bank going bankrupt. To be honest, I am far from understanding the whole picture since I am a software engineer with almost zero interest in finance and economics but here’s a short explaining what’s going on. When such things start to happen it is not unusual to see a domino effect happening. In the near future we might hear more news like this.

I am sorry to say that my current post has a somewhat negative tone that is not reflective of what I truly wish for myself and the industry as a whole. I remain optimistic and hopeful that everything will eventually turn out for the best.